Friday, May 18, 2012

Not a block for Robyn, but.....

How about a Llama pillow???
 I just love him.
And as a perfect companion?? A selvedge quilt!
(tutorial here)
I am stoked about the way it turned out!!
It measures right around 60"x60", bound with Little Apples Aqua Buttons, backed with a trifecta of Remix by Ann Kelle, leftover squares from Theo's 1st Birthday quilt, and Denyse Schmidt's Diamond Check in Cornflower.
Yeah, it's a scrappy back.

I decided to hand quilt after machine quilting two blocks. I wanted a bit more emphasis on the "windmills".  I'm really glad I made the change. I love the chunkiness of the embroidery floss.
I treasure this quilt. Thank you again, ladies.
Just look at these two...
They were meant for each other!

Thursday, May 17, 2012

another tile for robyn

I had so much fun making the first one that I had to make another.  It went so much faster which made it even more fun.  Hope you can use another! 

To Robyn Love, Jen

Dear Robyn,

This square was a breeze to sew.
Let me restate:
It is a breeze to sew if you cut out a 5in square for block B instead of a 4.5in block.
My brain is fuzzy.
What can I say?
The second time I cut it and sewed it was a complete joy.
I hope it works for you.
I really tried to consider what would work together without being matchy-matchy.
Looking at all the other posted squares made me nervous.
They are so different. 
My simple brain loves a sense of uniformity. 
I cannot wait to see how they work together.

Love,

Jen


PS
Have I mentioned that I LOVE having my sister in the sewing bee?
I do.
She is the only person who would listen to me go step-by-step until she figures out where I went wrong.
She is the only person that will tell me that I put last month block together wrong. 
(Amy, I am remedying this before I send it to you.)
I appreciate her honesty. 
Truth be told, everyone needs a sister.
I love you Nicole.

Wednesday, May 16, 2012

Amy & Robin

This is for you Amy.  Sorry it is soo late...
The houndstooth is from DS Quilts Collection Aunt Edna. I had to use it especially since it was called 'Houndstooth Gold.' I think gold is a tricky color to come by and hard to use...at least for me :)

This one is for you Robin. I tried to make it not matchy and totally had a different center but it looked funny. I like this better & hopefully you will too!

I love those strawberries. Probable one of my all time favorite fabrics. It reminds me of being a kid and going to Colorado to visit my Grandpa George and Grandma Laura. They grew the most delicious strawberries in their back yard & were kind enough to send us out with a basket to pick them as we liked. Best tasting strawberries ever!

xoxo
Teriney

Monday, May 14, 2012

tile for robyn

This was such a fun square!  It was inspired by three things.  Spring!!!  The butterflies we just hatched! And the box of amazing fabrics my dear cousin Emily sent me!!  It feels like heaven looking at them and feeling inspired by them.  I hope you like it Robyn!  If you could use another just let me know.

Sunday, May 13, 2012

tile for Robyn

I promise it's not this crooked in person! Blame the photographer! At least the white looks white and not blue this time! :)
I loved picking these fabrics! I love how fabrics have a story!
The bottom fabric with blue and red circles was a gift from Teriney. The small red squares are from the back of my 12squared pinwheel quilt last year and inspired by Becca. The center one I picked just for Robyn.  I hope you enjoy it! I can't wait to see them all together!

Friday, May 11, 2012

Tiles for Robyn

Dear Robyn,
I really hope this is what you were going for!  I have to apologize for the Mad Hatter curves on the right side of the block.  It's a long story.  Enjoy!
xo
Becca


I Ironed it, I Promise!


How come you can iron your square and then when you bring it down stairs to take a picture of it, it has funny creases and wrinkles?

I really did iron it. Elizabeth just reminded me that it helps to use starch. So, Robyn, it will look better when you get it... except for the creases caused by folding it.

Oh, well.

Tuesday, May 8, 2012

owl emotions

Dear Robyn,

here is my antique tile square for you...


these owls crack me up.  the one in the corner is angry and I have to wonder why.  maybe it's because in high school zoology class, I dissected one of the pellets he coughed up to look for mouse bones.  The one in the other corner just looks sleepy.  or mad.  I can't tell.  The little guy on the top left looks really surprised and the one next to him seems like he did something he doesn't want you to know about.  I'll let you make up your own stories about these guys.

enjoy!
em

Saturday, May 5, 2012

A Square for Robyn

Dear Robyn,
I started out with this square...
the seams were a little off, but mostly I was afraid that the fabrics would be a little too obnoxious to you.

Here is the second attempt... 
Let me know which one you want (or you can just have both).
xo,
Nicole

Here they are a little more in focus...


Friday, May 4, 2012

12 Squared Sampler

I thought I'd share my progress on my "12 Squared Sampler".  My plan is to make a red, white and blue version of everyone's blocks and then put them all together at the end of the year.
They are a scrappy bunch of squares.  Most of them are full of mistakes, mis-matched whites and crooked seams, but despite all that, I'm loving 'em!


 P.S.  Dear Robyn, 
Don't worry, I did not forget to do yours!  I wanted to make a practice version before I did one to send to you.  And, you should be glad I got the extra practice because look at how poorly those seams match up! :)
xo,
Becca


Robyn's Tile

I love this pattern!


I hope you like it Robyn.
I had to hurry and get it done so I can start my other son's quilt.

Thursday, May 3, 2012

For our BYU fan

Our 7 year old Hayden, is a huge BYU fan. When we moved to Ohio we had enough bedrooms to separate the boys and all Hayden wanted was a BYU room. I had no problem getting it decorated quickly, but it took me a long time to get his bedding done. I'm excited for him to get home from school so he can see it.

The pattern is called "Yellow Brick Road". It basically has 3 or 4 different size cuts arranged in 3 different squares then lay them out anyway you want. Not at all hard.

Tuesday, May 1, 2012

Antique Tile for May!


I have honestly been dreading picking a square.  That could be, in part, due to some busy times my way behind the scenes...but, if I'm honest with myself it's because in picking a square my novice status seems pretty apparent.

This square was a last minute substitution for another square (actually a hexagon) that just didn't lend to the quilting bee format.  That being said, I'm really happy with this little sub!  It worked up quickly and was a lot of fun.  This square is also from the fresh lemons site.  I really like her fabrics and style.  

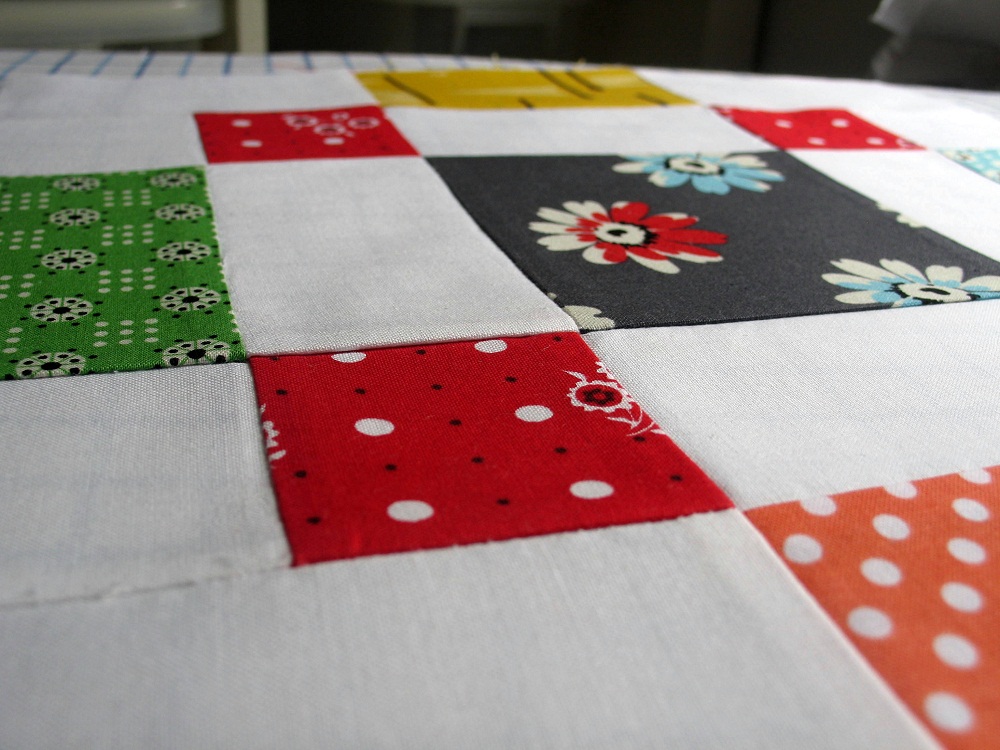
Have you waited anxiously long enough?  Okay, here it is.  (Sitting on a towel in my driveway.)


Here's the source for your reference.  Her fabrics are gorgeous and her diagrams help a lot.  I'm going to do my darnedest to do something quality-ish tutorial wise, but she's the pro so I would recommend a look at her site.  

So, here goes!

You're actually making two squares.  One square (on her diagram it's called BLOCK B) that will then be cut into quarters (BLOCK B - QUARTERED in the diagram).  Those four quarters make the four corners of the finished second square or BLOCK A (so named on her diagram).  You can see how in mine all of my four little corner color squares are yellow polka dots.  (Or little fried eggs as I'm sad to say...)  In her BLOCK A each little corner color square is different because she made up multiple BLOCK Bs and then used pieces of different BLOCK Bs to make her four different colored corners in her BLOCK A.  You will just make one BLOCK B like mine to be used for your BLOCK A corners.

1.  Fabrics: I am not committed to a specific color scheme with this quilt.  I want the colors to be vibrant, rich, and fairly basic.  No pastels, neon, distinctly fall colors or overly dark (maroon, emerald green, etc.) tho some navy is welcome.  I love the colors she used in her block.  And I love the colors on her pinwheel quilt that I linked to above.  

I don't want certain squares to be assigned specific color themes.  I'd love for each square to have many different colors that loosely work together.  Mine, speaking in general terms, has a yellow, orange/coral, green, blue, turquoise and gray.  You can mix and match as she and I did.  I honestly feel that mine is a little too matchy matchy.  I think because my center print has lots of different colors I subconsciously color matched a bit to that and it looks a bit too congruent, if that makes sense.  Not bad, but not my intent.  I like how hers works well together but has some dissonance. 

I would love all of your 6 different fabrics to be prints, no solids.  I am not a straight modern or vintage girl, but I prefer those two general fabric families.  I think what I don't like can be said best in the immortal words of Kristin Sharp: no Sponge Bob.  Ha.  I have zero fears of that from you guys.  However, I did add some whimsy/vintage-ey prints that might lead you to think novelty fabric.  I think there's a difference...although my center U.S. piece is borderline.  I'd say 0-2 whimsy prints are the range for the square.

If you look at the two fresh lemons quilts and follow their eclectic and varied color and print combos/ideas I'll love it.  I'd say just pick some stash fabrics that are your favorites (hee) and see if they'd make a nice family on your square.  The nice thing is that the pieces for the most part are small, so even a hefty scrap is plenty.

Also, if you could use KONA brand 100% cotton for the white that would be great.  I am totally happy to provide it to all of you.  Just let me know if you need it and I'll get it right out.  And if you have white of a different brand, just let me send you the Kona for continuity's sake throughout the quilt.  (:

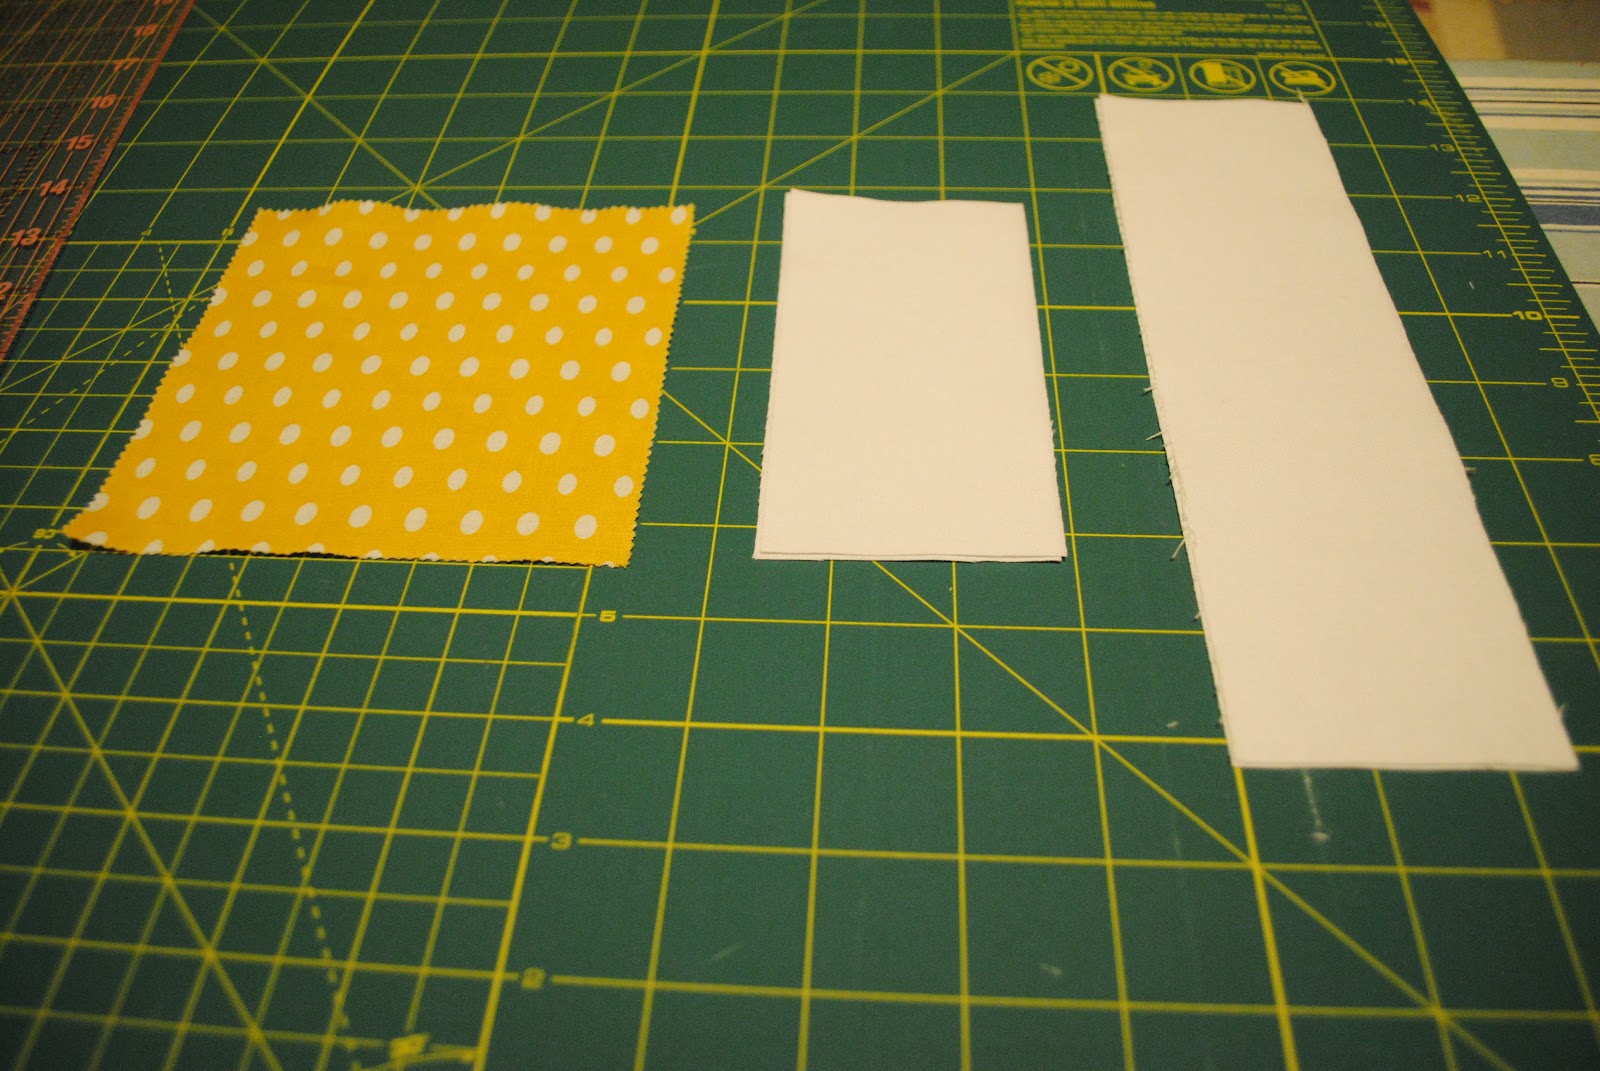
2.  BLOCK B:  You will need to cut out two 2.5 x 5 strips of white, two 2.5 x 9 strips of white, and one 5 x 5 print.  


Then just sew the two 2.5 x 5 strips to either side of the 5 x 5 and press (seams together towards the print).


Next sew the two 2.5 x 9 strips to the other sides and press seams toward the print.


I forgot to take a finished picture of BLOCK B, but I did take a picture of it after I quartered it.  Cut it so that each quarter is 4.5 x 4.5.


 See?  Fried eggs!  What was I thinking!  I didn't even notice until it was done!  I debated between this yellow and a lighter one.  I think I might have chosen unwisely.  But I'm sure you guys have realized my inability to not see flaws in what I quilt.  Oh to have the gift of unseeing!

Okay, back to the job.  

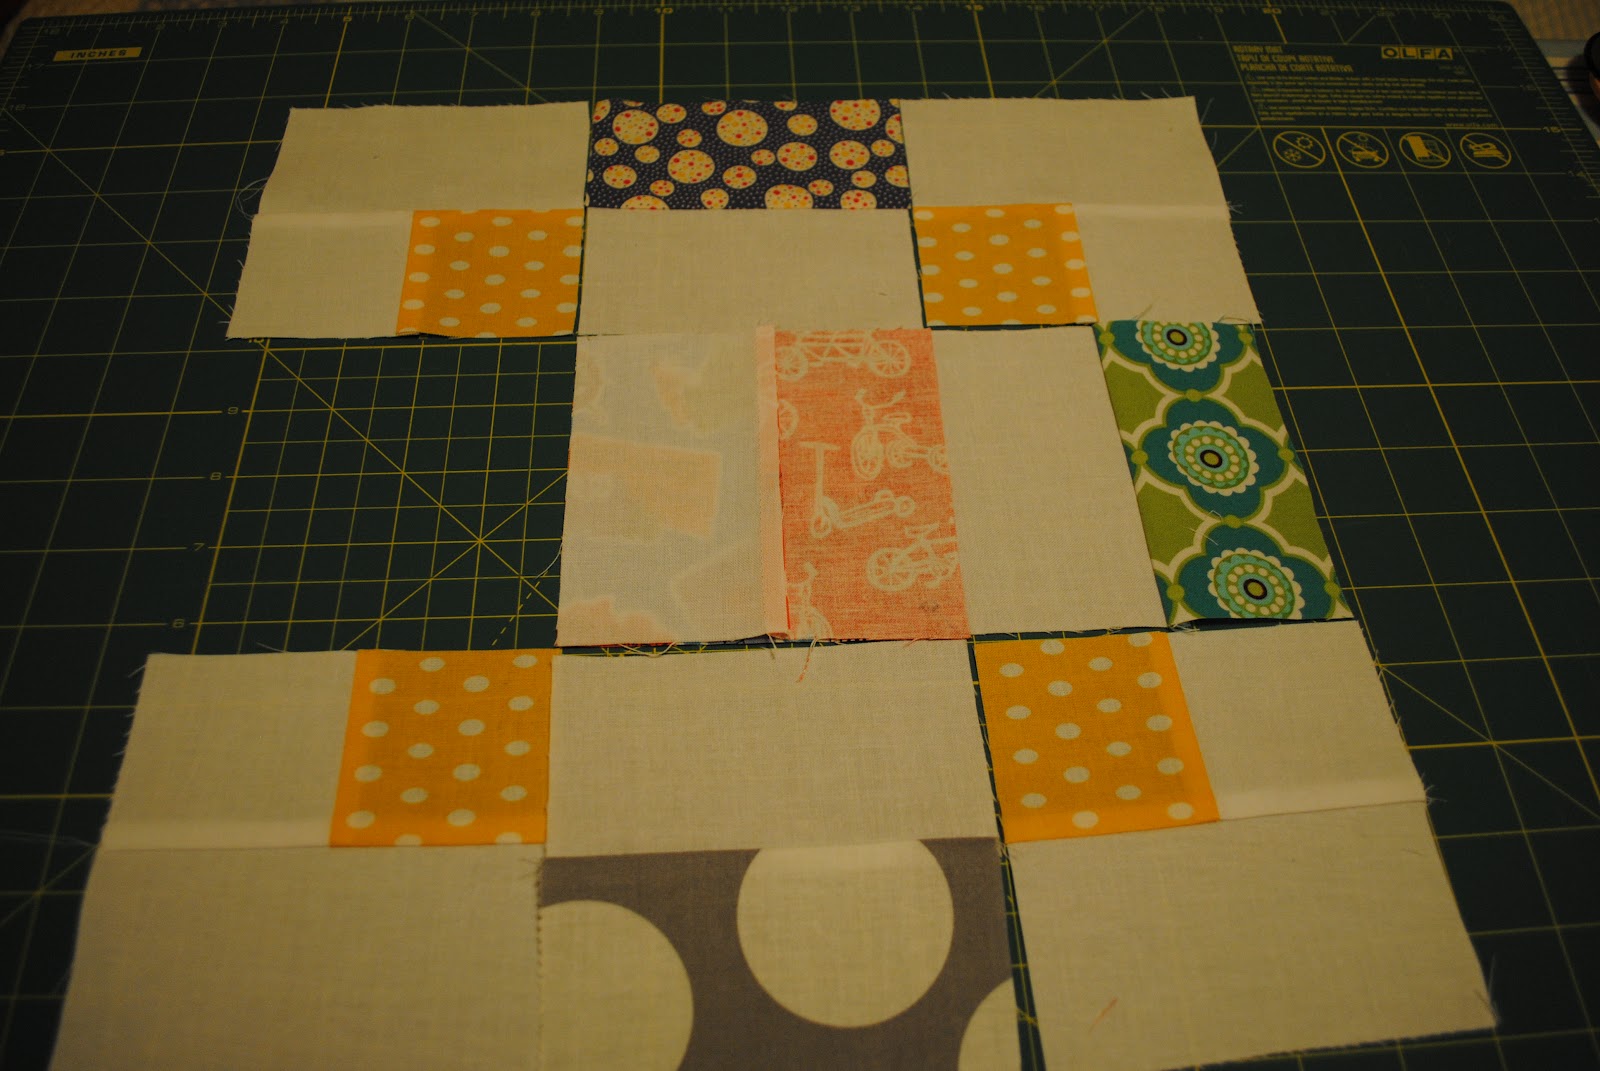
3.  BLOCK A: You will need to cut out four 2.5 x 4.5 strips of white, four 2.5 x 4.5 strips of four differing prints, and one 4.5 x 4.5 print.


Go ahead and lay them out in position.  If you want to you can put the finished BLOCK B – QUARTERED corners on to make sure you're liking the colors together and general layout. 


Then you just sort of start sewing!  I began sewing all four of the 2.5 x 4.5 strip pairs together.  For the most part I'd press the seams together towards the prints.  There will be one point where you won't, I'll show that later.


 Once you've done all four pairs you can lay it out to get the final look.  You can see I swapped two positions at this point.  Despite the whole making-two-squares-thing the finished product came together so fast and was really gratifying!


 Then just sew the horizontal rows.  I started with the middle row.


 And I pressed those seams toward the print.


For the other two rows you'll want to sew together as well, but press the seams toward the white (as pictured below) so the pressed seams nestle together nicely for sewing the rows together so your points match easily.


Once you've sewn each row you just need to sew the three rows together!  Hopefully those alternately pressed seams will help with your points.

  
And then, voila!  Press and such and you're done!  


Thanks for your patience with the dark pictures and generally amateurish tutorial.  If you see a mistake I've made or have any questions feel free to comment here or to email me.  And again, the diagram and information here are invaluable.

I appreciate you girls.  It's been a welcome challenge to join this group and see your beautiful ideas, projects, fabrics, styles, etc.  Also, your genuine kindness and enthusiasm have been a joy.  I hope you enjoy making this square!  Thanks in advance!

(Also, sorry the spacing is weird.  I started this in word and blogger's been hatin' on me about that ever since.)