Being the last square of the year, I have had ample time to choose my square, change my mind and repeat this pattern over and over again. Anyone in 12squared in the year 2011 will find my selection repetitive.
Yes, I am choosing to do the SpiderWeb once again. This time it is a slightly different technique and a completely different fabric choice.
Materials Needed:
White paper
Glue stick
6 inches of Kona White (PLEASE, PLEASE make sure you are using Kona White.)
Tons and Tons of selvage edges. (.5 in-.75 in of fabric showing)
Scrap fabric for corners (optional)
For credit here are the two sites that I gleaned/copied directions.
To start the process, take a sheet of 8.5"X11" paper and square it off to 8.5". Cut the 8.5" square on the diagonal from corner to corner... being very careful to make exact triangles. From one of these triangles we will cut our kite template for the spiderweb background fabric and the triangles for the paper/foundation piecing.
Take the triangle and fold it in half along the long side. Draw a line 1/4" from the edge on the long side of the triangle. This is included seam allowance. Also draw a little line 1/4" from the fold, so that the line crosses the long seam allowance line you drew. You can see a tiny hash mark on the fold, I needed to be able to SEE the fold with my ruler on it. (Note: I used color paper to make the pictures easier to view. Please use white paper.)
 Measure with your ruler 2 3/4" from the fold and make a mark along one short side of the triangle. Connect the dots between where the two lines cross and the 2 3/4" dot along the top of the triangle with your ruler and a pen or pencil.
Fold the triangle in half again along the fold and cut on the cutting line. Open up your template. This is the shape you will use to cut your background kites! The seam allowance has already been added.
*You will need a total of 1 kite templates and 8 triangles for the piecing.
Next up, you will need trace and cut 8 kites from your 6 inches of Kona white.
You ready to begin!
Dab a bit of glue stick on the center of the triangle..just one swipe will do! The glue stick helps hold the kite in place and doesn't distort like pins can when pinning through paper.

REALLY IMPORTANT TIPS:
*You will want to shorten the length of your stitch on your machine. This makes your sewing more secure, and it perferates you paper for easier removal.
*You are going to reverse stitch at the beginning and end of every strip. If you don't they will unravel and become a terrible nightmare.
With the print-edge of the selvage facing the edge of the kite, sew selvage on 1/8 in seam allowance. 1/8 is tricky to sew... slow and steady is my suggestion.
You will iron open each strip... and repeat the process of adding a strip. Please make sure your print is facing the kite and not your selvage edge. I made this mistake and had to start over a few times. Try to balance your colors as you go. Mix lighter and darker fabrics so that your is not drawn to a specific place on your square.
Here is where you have an option.
When I got to the points of the triangles, I opted to use some of my favorite scrap material (material I did not have the selvages for). These scraps were generally 1.25 inches or less. You are also welcome to use selvages for the entire block.
Once you have sewn on both sides of strips, you will what to trim your edges.
Remove paper foundation (GENTLY!).
You will repeat this process until you have 8 triangles.
Then sew the triangles together to make 4 squares.
Sew those four squares together to create the SpiderWeb.
Iron your seams as to create no bulky sections.

One more thing... it has to do with the fabric.
My sister and I have something in common.
We are both super picky.
It is probably genetic.
I do not what to hurt or offend or scare anyone, but I also what to LOVE my squares.
That said, please do not be bothered by my fabric guidelines, but please follow them.
All selvage edges are NOT created equal. Not even close.
Cheap fabric has little to no usable selvage edge.
Please, please, please use good selvages... which means using quality fabric.
This means using designer fabric in most cases (but not in all.)
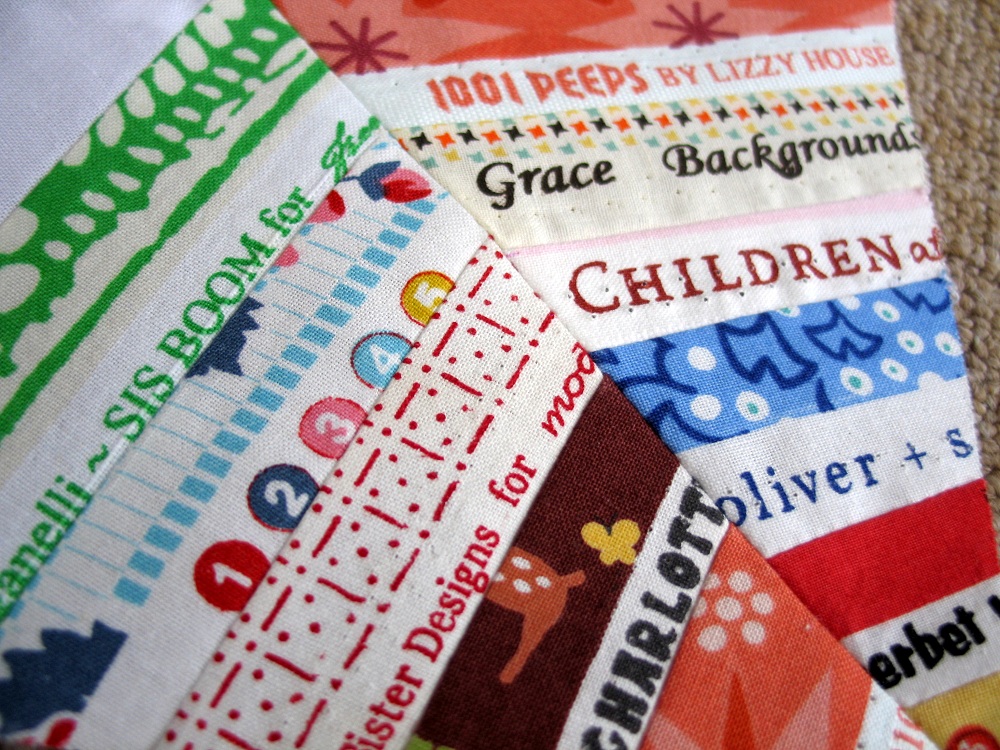
In the picture above you can see how interesting the selvages are, I LOVE the look.
It gives the quilt an "I Spy" effect that I am dreaming of.
As for color, I want vibrant and happy with out ANY hint of neon.
Think rainbow. Yellow, Orange, Red, Purple, Pink, Blue, Navy Blue, Teal, Green, Gray. The square I made is the perfect example for the color.
Absolutely no Gold, Silver, Maroon, Black, Forest Green or Muted Colors.
Please have fun with this square. I have bikes, foxes, olives, and strawberries peeking out of this square. There are hidden phrases, and fabrics from most everyone's 12squared squares. I LOVE, LOVE, LOVE this square.
If you need Kona White or selvages, please let me know. I will ship them to you ASAP.
PS One last thing, I am typing with a baby strapped to me. If this post is lacking or does not make sense, please let me know. Here is the evidence.
One super scary picture of me. No make-up, hair in a bun, and yes, my forehead is really that big. BUT Man, isn't he the sweetest thing ever?





.jpg)
.jpg)


